> HTML source: [How to Draw on Screen on a Mac: TeachingInk Guide | Haloa](https://haloa.cc/guides/teachingink/draw-on-screen/)
> Page language: en
[TeachingInk](https://haloa.cc/apps/teachingink/)[Support](https://haloa.cc/apps/teachingink/support/)
# How to draw on your Mac screen and circle a point
Open the webpage or slides you want to explain, turn on TeachingInk annotation, and circle one point with the regular pen. Ordinary marks stay until you erase or clear them, so you can build an explanation as you speak.
Applies to the released version TeachingInk 1.3.0 · macOS 14.0+
Information checked 2026-10-24
## Before you start
**Tools and access:**Pointer, pen & eraser · Basic tools
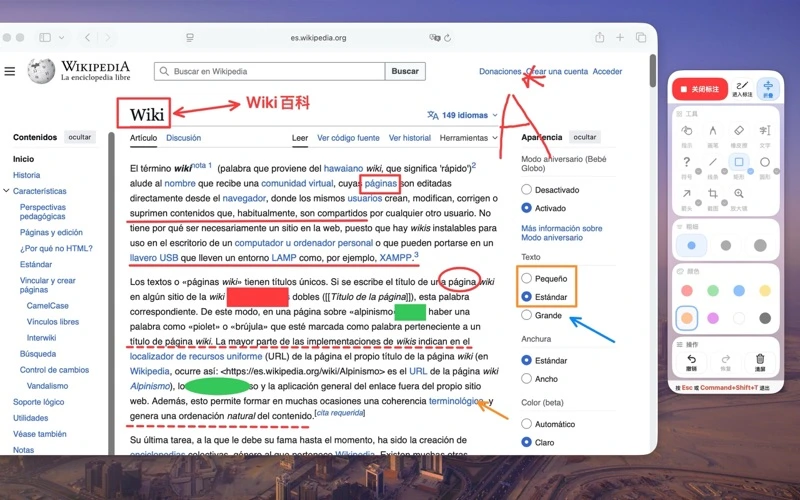
Real interface overview from an earlier version; the exact build is unknown. This illustrates annotation over a webpage, not every step in this guide.
1. ## Prepare the content you want to explain
Open a webpage or slide without private information and practise in a normal window first. Position the area you want to discuss, then launch TeachingInk. PowerPoint full-screen presenting and meeting sharing need verification in your own setup.
2. ## Turn on annotation and draw a circle
Start annotation from the menu bar or floating palette, select the regular pen, and drag to draw a line or circle around a point. The regular pen is a basic tool. Check Pro access before using advanced tools such as arrows, text or shapes.
3. ## Tidy the canvas with erase and undo
Undo a mistaken stroke, or use the eraser to remove part of your explanation. Keep the useful marks readable instead of covering the page. Clear removes annotations from the current canvas; take a screenshot first if you want to keep the result.
4. ## Handle your marks before changing content
TeachingInk does not automatically match marks to individual slides. Decide whether to clear the current annotations before changing a slide or webpage. Turn annotation off to return to the underlying app. Do not rely on the previewed click-through tool being available in your installed release.
## Questions for this task
### Do I need Pro to start drawing?
The regular pen, eraser and basic board writing are basic tools. Text, arrows, shapes and other advanced tools require Pro. Check the app and the App Store purchase confirmation for current access and pricing.
### Why does clicking a webpage draw a line?
While annotation is on, the mouse is used for the selected annotation tool. Turn annotation off to interact with the webpage or slides. The previewed click-through feature has its own version and Pro requirements; do not assume your installed release has it.
### Will everyone in a meeting see the marks?
Your own screen is not sufficient evidence. An independent annotation layer may be outside a shared single window. Check the chosen sharing mode from an audience device before the presentation.
After circling a point, try a board for a short explanation. To keep ordinary annotations in an image, continue to the screenshot guide.
## Use TeachingInk on your Mac
Draw over other apps with the Mac app. The App Store shows availability and purchase terms for your region.
[](https://apps.apple.com/app/id6761326660?mt=12)
[TeachingInk product page ↗](https://haloa.cc/apps/teachingink/)[All support topics ↗](https://haloa.cc/apps/teachingink/support/)[Privacy policy ↗](https://haloa.cc/apps/teachingink/privacy/)
## Continue learning
- [How to use a whiteboard or blackboard on your Mac ↗](https://haloa.cc/guides/teachingink/whiteboard-blackboard/)
- [How to save a screenshot with your annotations ↗](https://haloa.cc/guides/teachingink/annotated-screenshots/)
[Documentation index](https://haloa.cc/llms.txt)